SES POW - Firmware
Flashing firmware to a SES POW device involves replacing the device's original firmware with SES custom firmware. This can unlock additional features and customization options not available in the original firmware. This process, known as "flashing," is advanced and should be performed carefully to avoid damaging the device. Below is a step-by-step documentation to guide you through the process of flashing firmware to a SES POW device.
Prerequisites
- SES POW Device: Ensure your device is a SES POW model.
- Flash Station: Ensure flash station is configured to flash POW device.
- Smarter Energy Controls - Flasher Tool: Software to upload the firmware to the device.
Download tool from here.
Safety Warning
Flashing firmware can potentially brick your device or void its warranty. Proceed at your own risk.
⚠️️Special Attention ⚠️️
Do not connect AC power and the serial connection at the same time The GND connection of the Pow is connected to the live AC wire. Connecting serial with your PC will fry your PC and will electrocute you.
Hardware Connection
- Disconnect SES POW from Power: Ensure the device is not connected to any power source.
- Open the SES POW Case: Carefully open the case to access the PCB.
- Identify Programming Headers: Locate the programming header pins on the PCB. You should find VCC, RX, TX, and GND pins, along with a button on pcb.
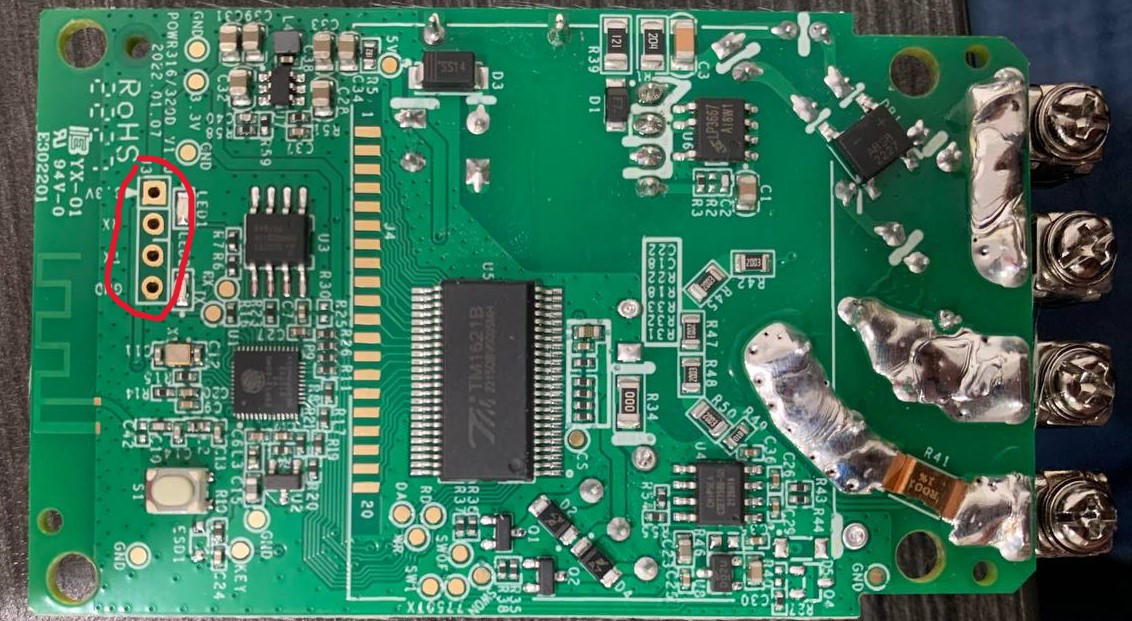
- Connect
Flash Station Adapter: Using the jumper wires, connect the adapter to the SES POW as follows:- Adapter TX to POW RX
- Adapter RX to POW TX
- Adapter GND to POW GND
- Adapter VCC to POW VCC (3.3V)
- Enter Programming Mode: To enter programming mode, you need to press button on POW before connecting Flash station USB to your computer. When plugged release the button and as a result device should be in flashing mode.
Flashing the firmware
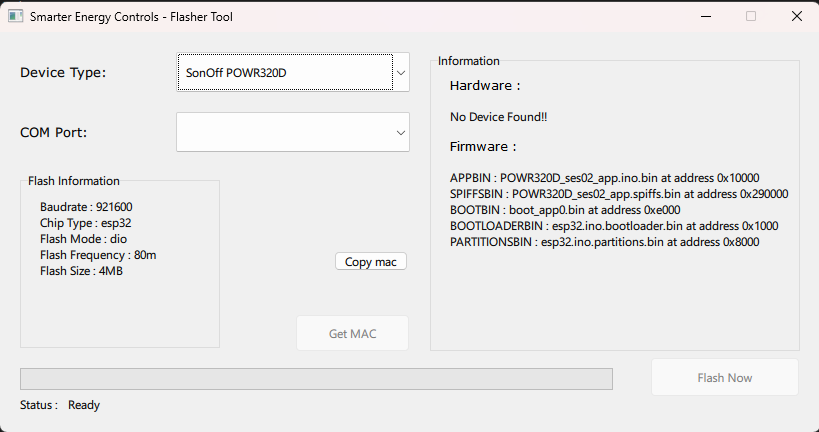
- Open the Flash Tool: Launch the
Smarter Energy Controls - Flasher Toolyou installed. - Select the Device Type: Select device type
SonOff POWR320Don flasher tool. - Select the COM Port: Choose the COM port that your FLash Station is connected to. This should appear automatically in the tool.
- Flash the Device: Initiate the flashing process. This typically involves clicking a "Flash Now" button in graphical tools.
Reassemble and Test
After the flashing process completes:
- Disconnect the Adapter: Carefully disconnect your device from the adapter.
- Reassemble the SES POW: Put the case back together.
- Power On: Connect the SES POW to power.
- Test the Device: Verify that the new firmware is running and configure it as needed.
Troubleshooting
- Device not showing on Flash Tool:
- Check all connections of flash station
- Disconnect the Flash Station USB from computer and press the button on Device and re-plug the USB to computer while pressing the button. After USB connection release the button.